oCam

 (123 votes, average: 3.97 out of 5)
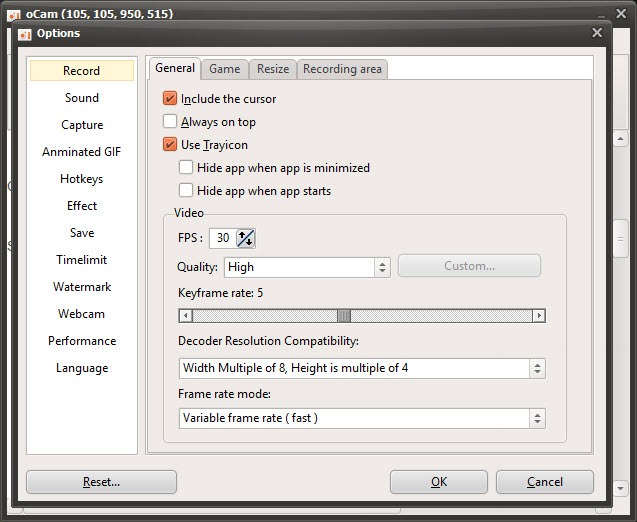
About oCam
oCam records what’s on your screen, and it keeps the whole process about as simple as screen capture gets. Mark the area you want, hit Record, hit Stop, and you’ve got a video. That’s the core loop, and the tool wraps it in a small, fast interface that doesn’t bury you in options before you’ve captured a single frame.
Underneath that simplicity sits more range than you’d expect. The tool splits its work into three modes you pick from tabs along the top. There’s screen recording for general capture, game recording tuned for smoother gameplay footage, and a sound-only mode for grabbing audio on its own. So the same tool that records a quick software demo can also capture a gaming session or rip the audio from something playing on your machine.
The part that earns it real loyalty is the audio handling, which is better than a lot of heavier tools manage. It captures the system sound, your microphone, or both at once, so adding live narration over a tutorial is a single setting rather than a workaround.
And it does the system-sound capture cleanly, without forcing you to fiddle with a stereo-mix setup the way many recorders demand.
Choosing what to record
Flexibility starts with the recording area. You can grab the full screen, lock onto a single window, or drag out any custom region you like, with the capture zone marked by a green border so you always know exactly what’s being recorded. There are size presets too, handy when you need a standard resolution like a clean 1080p frame rather than whatever odd dimensions a freehand drag produces.
That precision matters for tutorials especially. Being able to frame just the application window you’re demonstrating, and leave the rest of your cluttered desktop out of shot, is the difference between a clean instructional clip and a messy one.
A comparable tool like CamStudio covers basic area capture too, but the preset sizes here save fiddling when you want an exact frame.
The audio options that set it apart
Plenty of screen recorders treat audio as an afterthought. oCam does not. You choose your audio source directly, system sound only, microphone only, both together, or no sound at all, depending on what the recording needs. For a narrated walkthrough, capturing system audio and mic together in one pass means your voice and the on-screen sound stay in sync without any later editing.
The standout technical point is how it grabs system audio. Many recorders rely on a stereo-mix input that isn’t always available or enabled, leaving people stuck when they can’t capture what they hear.
This tool uses a loopback method that pulls the system sound directly, sidestepping that whole headache. There’s also a dedicated sound-only mode for when you want to record audio with no video at all, turning the application into a quick clip recorder in its own right.
Game recording and codec control
The game recording mode is built differently from standard screen capture. It hooks onto a recognized game window and can use hardware encoding, offloading the work to your graphics card so the recording itself doesn’t tank your frame rate mid-match.
That’s the trick to capturing gameplay smoothly rather than ending up with a stuttering mess. One quirk to know. This mode needs to detect an actual game window to start, and it throws an error if it can’t find one, so it won’t record an arbitrary window the way the main screen mode will.
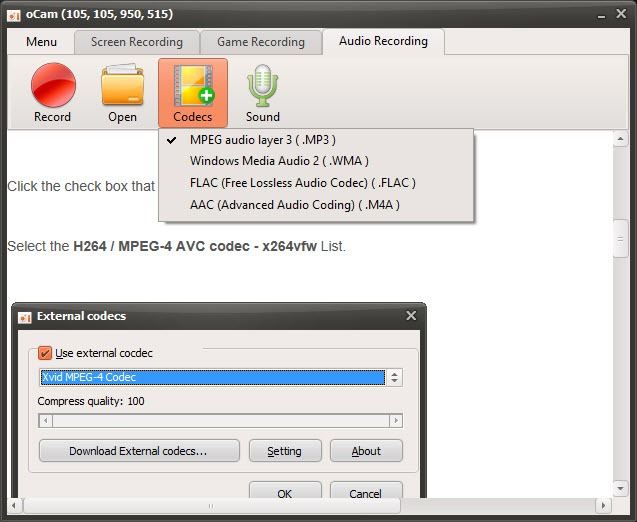
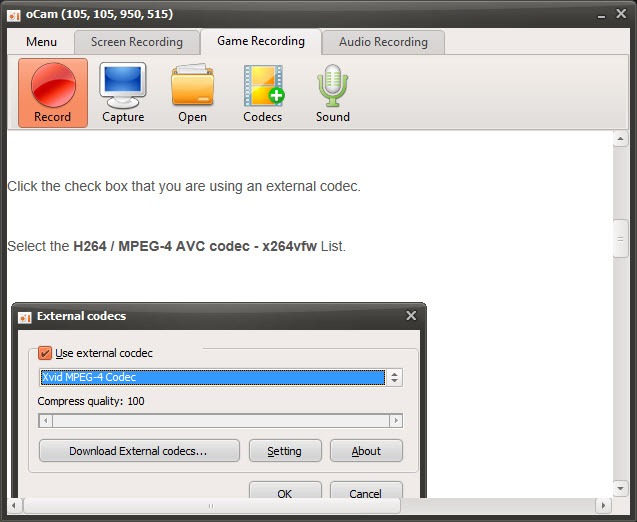
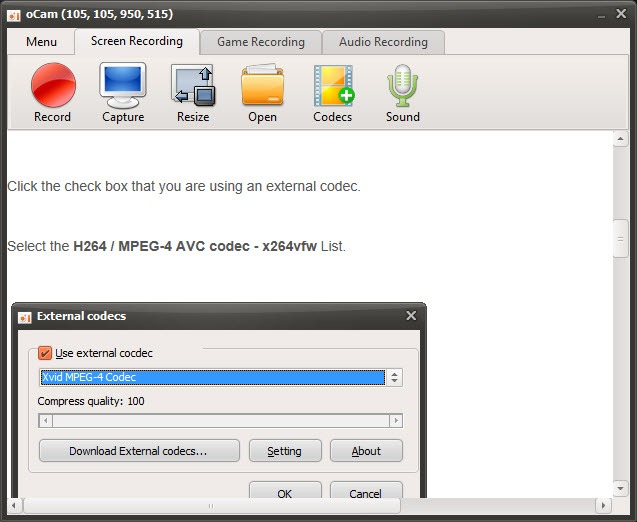
On the output side, the codec choice is unusually broad for such a simple tool. The default produces a widely compatible MP4 file, but you can dig into the codec menu and pick from a long list of video formats, lean on hardware encoding for game capture, or even bring in an external codec for a specific need.
For game capture specifically, a dedicated tool like Fraps is the old benchmark, but oCam folds similar capability into a more general recorder.
Screenshots, GIFs, and the everyday extras
Recording isn’t the whole story. The tool also takes still screenshots, saving them in common image formats, so you don’t need a separate capture utility for a quick grab. It can record straight to animated GIF as well, which is the easy way to make a short looping clip for a chat or a forum post without converting a video afterward. If GIF is your main interest, something like GifCam specializes in it, but having it built in here is convenient.
The smaller touches add up. You can include the mouse cursor in a recording and highlight clicks, which makes a tutorial far easier to follow when viewers can see exactly where you’re pointing and tapping.
Hotkeys let you start, pause, and stop without breaking your flow to find a button, recordings autosave and name themselves the moment you stop, and there’s even a scheduling option to start a capture at a set time. It stays light on memory and processor throughout, so it runs comfortably on modest hardware where a heavier recorder would struggle.
Conclusion
oCam hits a sweet spot between simple and capable. The record-stop loop is easy enough for a complete beginner, yet underneath sit three recording modes, strong audio handling, a deep codec menu, and extras like GIF capture and screenshots that together cover most everyday recording jobs. For tutorials, gameplay clips, and quick screen grabs, it does far more than its plain appearance suggests.
It knows its limits, and so should you. The editing is trim-only, so anything beyond basic cuts means moving to a real editor, and the occasionally clumsy translated text can make a setting or two puzzling at first.
But for anyone who wants to record a screen, with proper sound, without wrestling a bloated suite or hunting for a stereo-mix toggle, this is an easy and reliable pick that quietly does the job.
Pros & Cons
- Records full screen, a single window, or a custom area with a clear visual border
- Captures system sound and microphone together without a stereo-mix workaround
- Three dedicated modes for screen, game, and audio-only recording
- Game mode uses hardware encoding to record gameplay without crushing frame rate
- Wide choice of output codecs, plus support for external ones
- Built-in screenshot tool and direct-to-GIF recording
- Mouse cursor and click highlighting make tutorials easy to follow
- Light on system resources and quick to set up
- The built-in editor only trims, so real editing needs a separate program
- Some of the on-screen text reads as awkwardly translated in places
- Game recording refuses to start unless it detects an actual game window
- The sheer number of codec and encoding options can overwhelm a first-timer
- Lacks the polished annotation and effects of dedicated tutorial suites
Frequently asked questions
It records your screen as video and captures still screenshots, with separate modes for general screen recording, game recording, and audio-only capture. You set a recording area, choose your audio source, and start, making it a straightforward all-in-one capture tool.
Yes. You can capture system audio, microphone input, or both together in a single recording. This makes it easy to narrate a tutorial while also recording the sound coming from your screen, with no separate audio pass needed.
It has a dedicated game recording mode that hooks onto a detected game window and can use hardware encoding to keep the recording from slowing the game down. Note that this mode needs to find an actual game window before it will start.
It offers a wide range of output codecs, defaulting to a widely compatible MP4 file. You can open the codec menu to pick other video formats, use hardware encoding for games, or add an external codec for a particular requirement.
Yes. Alongside standard video, it can record directly to animated GIF, which is the quick way to create a short looping clip for sharing online without having to convert a video file afterward.
Yes. Besides recording video, it includes a screenshot tool that saves still images in common formats. This means you can grab a quick static capture without needing a separate screenshot application alongside it.