Display Driver Uninstaller

 (6 votes, average: 4.00 out of 5)
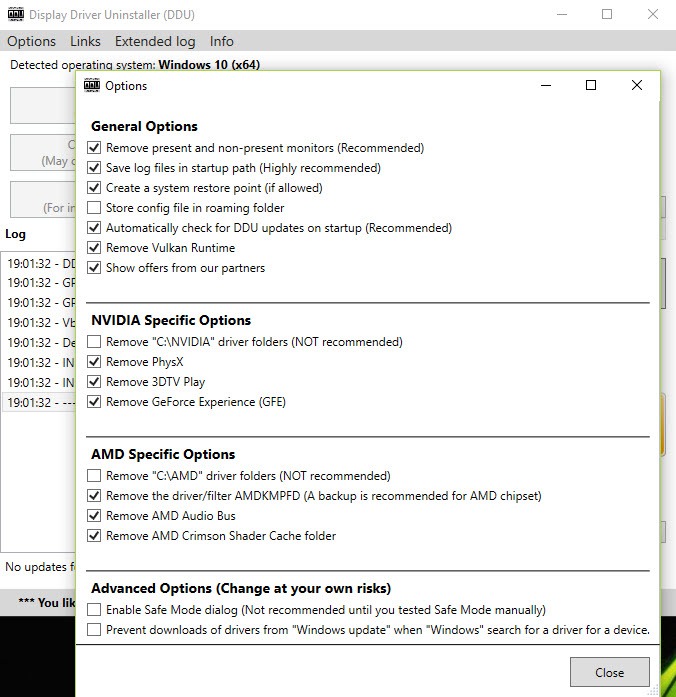
About Display Driver Uninstaller
Anyone who has ever wrestled with graphics driver problems knows the strange ritual that Windows turns the process into. You uninstall the old driver through Device Manager, install the new one, and somehow leftover registry entries, orphaned files, and corrupted configurations from the previous driver still cause problems.
Black screens, driver crashes, performance issues, or weird visual artifacts that refuse to go away even after a “clean install”. For PC enthusiasts, gamers, and IT professionals dealing with these scenarios, Display Driver Uninstaller (universally known as DDU) is essentially required equipment.
Developed by Wagnardsoft and refined over more than a decade, this tool has built a reputation as the gold standard for completely removing graphics drivers from a system before installing new ones. It doesn’t just uninstall the visible driver software, it digs deep into the registry, file system, and various other locations where graphics drivers leave traces, scrubbing the system clean so the new driver installs into a genuinely fresh environment.
What DDU actually removes that Windows can’t
The fundamental reason Display Driver Uninstaller exists is that the standard Windows uninstall process for graphics drivers leaves behind a substantial amount of residual data. Registry entries, Direct3D and OpenGL configurations, AppData files, scheduled tasks, services, and various other components stick around even after the driver appears to be uninstalled.
This residue causes most of the mysterious driver problems users encounter when switching between GPU brands or upgrading to new driver versions. The new driver tries to install over the remnants of the old one, configurations conflict, and the result is anything from minor visual glitches to outright crashes and black screens. By removing every trace of the previous driver, this software ensures the new installation has a clean foundation.
For users who have ever spent hours troubleshooting driver issues that turned out to be caused by leftover files from previous drivers, this scrubbing approach saves significant frustration and time over the long run.
Support for NVIDIA, AMD, and Intel graphics
The tool handles drivers from all three major GPU vendors, with separate cleanup paths optimized for each one. NVIDIA drivers, AMD Radeon drivers, and Intel graphics drivers all have their own quirks and locations where they store data, and DDU has been refined to handle each properly without missing anything important.
For users switching from one brand to another (a common scenario when upgrading from an integrated Intel GPU to a discrete NVIDIA or AMD card, or switching between NVIDIA and AMD between system builds), this comprehensive vendor support ensures the old vendor’s drivers are completely removed before the new vendor’s drivers are installed.
The tool also handles audio drivers from these vendors, which is particularly relevant for HDMI audio components that often ship with graphics drivers and can cause their own conflicts when not cleanly removed.
Safe Mode operation for thorough cleanup
The recommended workflow for using Display Driver Uninstaller involves booting Windows into Safe Mode before running the cleanup. Safe Mode loads only essential drivers and services, which means the graphics driver isn’t actively in use, and the cleanup can remove components that would otherwise be locked or in use during normal operation.
The application includes a built-in option to automatically restart the computer in Safe Mode and continue from there, which simplifies what would otherwise be a multi-step manual process. After the cleanup completes, Windows can be restarted normally with no graphics driver loaded, ready for a fresh installation.
This Safe Mode approach is genuinely important for the cleanup to be thorough. Running DDU in normal Windows mode works in some scenarios but can leave behind the very components that the tool exists to remove, defeating the purpose of using it in the first place.
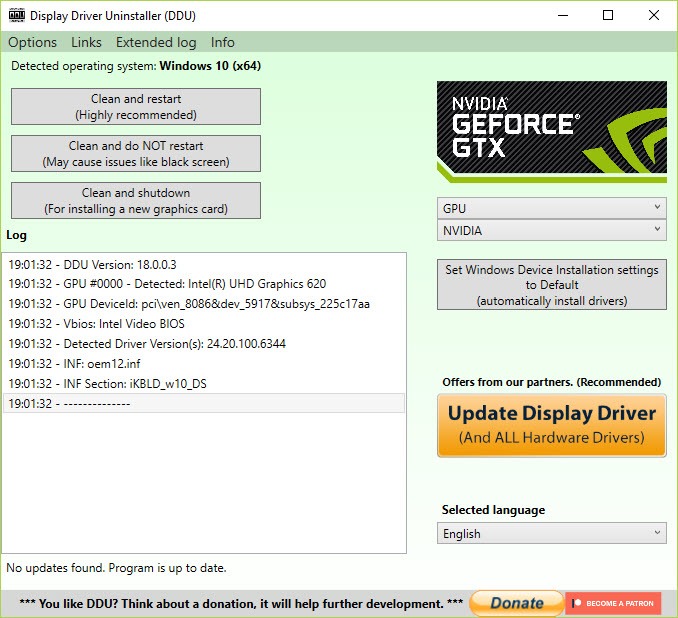
Three cleanup options for different scenarios
The main interface presents three primary actions: clean and restart, clean and shutdown, and clean without restarting. Each suits different situations.
The most common option is “Clean and Restart,” which performs the cleanup and then immediately restarts the system. After the restart, you install your new driver into a clean environment, and everything works as expected.
“Clean and Shutdown” is useful when physically swapping graphics cards, since you can shut down after cleanup, install the new card, and boot up with no old driver fighting the new hardware.
“Clean without restarting” is for advanced users who want to perform additional manual cleanup or other operations before restarting. It’s rarely used by most users but exists for the scenarios where it matters.
Vendor-specific options for fine control
For users who want more granular control, the application includes options to remove only certain components rather than wiping everything. You can choose to remove just NVIDIA drivers while leaving AMD components untouched, for example, or remove specific component types like audio drivers while keeping graphics drivers in place.
These options matter for situations like multi-GPU systems, troubleshooting specific component issues, or scenarios where complete cleanup would be more disruptive than helpful. For most users the default “remove everything from this vendor” approach is appropriate, but having the granularity available is genuinely useful for technical users.
Backup options before cleanup
Before performing the cleanup, this software can create a backup of the existing driver configuration, which provides a safety net if something goes wrong during the new driver installation. While this is rarely needed in practice, the option exists for situations where users want maximum caution.
The backup can be restored if necessary, returning the system to its previous state. For users approaching driver troubleshooting carefully, particularly in production or work environments where downtime is costly, this safety mechanism is worth having even if it’s rarely used.
When to actually use DDU
Despite its capabilities, this software isn’t for routine use. Most driver updates work fine through the standard installation process, and using DDU unnecessarily adds steps to a workflow that doesn’t need them. The right scenarios for breaking out this tool are specific.
When switching between GPU vendors (NVIDIA to AMD or vice versa), this software is essentially required to avoid conflicts. When troubleshooting persistent driver issues that survive normal reinstallation, it’s the diagnostic step that resolves problems regular uninstalls can’t. When preparing a system for resale or reuse with different hardware, it ensures a genuinely clean state. And when a particular driver installation has clearly gone wrong (corrupted files, failed installations, system instability), this tool provides the reset button.
For routine driver updates within the same vendor and same major version family, the standard uninstall and install process is usually fine. Reaching for DDU should be a deliberate decision based on specific needs rather than a default habit.
Conclusion
Display Driver Uninstaller has earned its place as essential equipment in the toolkit of anyone who deals with graphics driver issues regularly. Whether you’re a gamer chasing maximum performance, an IT professional supporting users with weird display problems, or just someone who has finally upgraded their graphics card and wants to make sure the new one starts in a clean state, this tool handles the job with the kind of thoroughness that makes everything afterward go more smoothly.
It’s not a tool you’ll use every week, and that’s actually part of its appeal. Display Driver Uninstaller is the right tool for specific situations rather than a casual everyday utility, and for those specific situations, nothing else really compares.
When you need a graphics driver completely gone before installing a new one, DDU is essentially the only answer.
Pros & Cons
- Removes every trace of graphics drivers including registry, files, and configurations
- Supports NVIDIA, AMD, and Intel graphics drivers with vendor-specific optimization
- Safe Mode operation ensures thorough cleanup of locked components
- Multiple cleanup options for restart, shutdown, or no restart scenarios
- Vendor-specific options allow targeted cleanup rather than removing everything
- Backup capability provides safety net for cautious users
- Industry-standard tool used by enthusiasts, IT professionals, and tech support globally
- Should be used in Safe Mode for proper cleanup, requiring extra setup steps
- Not necessary for routine driver updates within the same vendor
- Aggressive cleanup can occasionally remove components that other software depends on
- Interface is utilitarian and assumes users know which options apply to their situation
- Misuse can leave the system without graphics drivers, requiring manual reinstallation
Frequently asked questions
This tool is best used when switching between GPU vendors (like moving from NVIDIA to AMD), when troubleshooting persistent driver issues that survive normal reinstallation, when preparing a system for hardware changes, or when a previous driver installation has clearly failed. For routine driver updates within the same vendor, the standard uninstall process usually works fine.
Safe Mode is strongly recommended because graphics drivers in active use can lock files and registry entries that the cleanup needs to remove. Running this software in normal Windows mode often leaves behind exactly the components it's supposed to remove, which defeats the purpose. The application includes a built-in option to automatically restart in Safe Mode for this reason.
This tool removes the vendor-specific drivers (NVIDIA, AMD, or Intel) but leaves the basic Windows display driver in place, so your computer will still display video after cleanup, just at basic resolution and without acceleration. After installing your new driver, full functionality returns immediately.
Yes, this software works on laptops with discrete graphics, integrated graphics, or both. The same principles apply: clean up the existing driver completely before installing a new one, particularly if you're troubleshooting driver issues. Laptop users should ensure they have access to a reliable internet connection or have downloaded their new driver before running the cleanup.
After cleanup, Windows uses its generic basic display driver, which provides minimal functionality (low resolution, no acceleration, basic display only) but lets you keep using the computer. You can install a new driver at your convenience, and the system will resume normal operation once a real driver is installed.
The cleanup only affects driver components, not your games, applications, or personal files. Once you install a new driver after the cleanup, everything that depended on the old driver works again normally. The only exception is if you had specific driver-version-dependent settings, which are reset since the old configuration is gone.
Device Manager performs a basic uninstall that leaves significant amounts of driver data behind, particularly registry entries, configuration files, and various other components. This software performs a deep cleanup that removes everything, which is the difference between a half-finished uninstall and a genuinely complete one.
Yes, persistent black screen issues are one of the classic scenarios where this tool helps. By completely removing the problematic driver and any leftover components, you eliminate the conflicts causing the black screen, then install a known-good driver version into the now-clean environment. This often resolves problems that survived multiple normal reinstall attempts.
Yes, this software receives regular updates to maintain compatibility with the latest Windows versions, including current Windows 11 builds. The cleanup process adapts to changes in how Windows manages display drivers across version updates.
The optional backup feature creates a snapshot of the existing driver configuration before cleanup, which can be restored if necessary. For most users this isn't needed, since the whole point is to install a new driver immediately afterward, but the safety net exists for cautious scenarios.