

ISO to USB
About ISO to USB
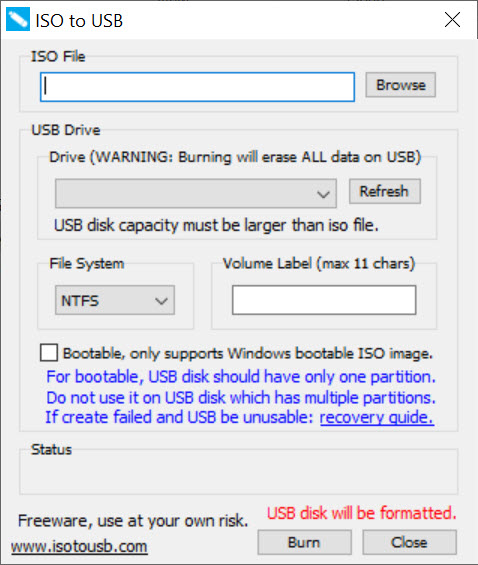
ISO to USB writes the contents of an ISO image onto a USB flash drive, and it can make that drive bootable so a computer starts from it instead of its hard disk. The window holds four things. A field for the ISO file, a list of connected USB drives, a file system dropdown, and a Bootable tick box. Fill them in, press Burn, and a small status bar at the bottom reports progress until the drive is ready.
That minimalism is both the appeal and the limit. There is no partition scheme to pick, no advanced mode, no download helper. It is the sort of tool you hand to someone who needs one installation stick and has never heard of a boot sector, and it does not pretend to be anything more.
Bootable mode and the boot managers it knows
Tick Bootable and the program writes a boot sector along with the files, so the stick will start a computer. Bootable mode works with system installation images that use the BOOTMGR or NTLDR boot managers, which covers the installation discs it was built for. Images that rely on other bootloaders, such as the live systems many repair tools are built on, are outside its reach.
Leave Bootable unticked and the tool simply unpacks the ISO onto the stick as ordinary files. That is handy when you only want to read what is inside an image, though an archive manager can open an ISO directly without touching a USB drive at all.
FAT32, NTFS and the old laptop case
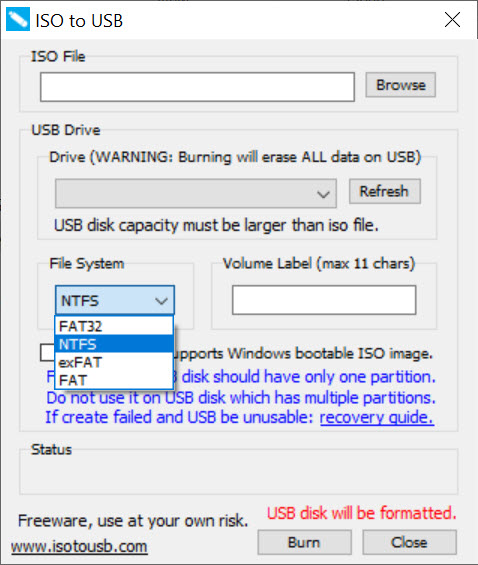
The ISO to USB file system dropdown offers FAT, FAT32, exFAT and NTFS, and the program itself recommends FAT32 for bootable sticks. FAT32 is what older machines expect to see before they will boot from USB, and it is the case where this tool earns its place. Some older laptops refuse to boot from anything but FAT32, and users report that other writers force NTFS on the same image while this one accepts FAT32 without complaint.
The catch with FAT32 is its 4GB file size limit. Modern installation images often contain a single file larger than that, and such an image cannot fit on a FAT32 stick however large the stick is. For those, NTFS is the only option here, and NTFS sticks will not boot on machines that insist on FAT32.
Speed, stability and what it lacks
Writing with ISO to USB is slow compared with the better-known tools, and reviewers and users both report the program hanging or crashing mid-burn. If the status bar stops moving for several minutes, the burn has usually failed and needs starting again.
Use a stick you do not mind erasing, since every burn wipes the drive completely, and check the drive letter twice before pressing Burn.
There is no UEFI-specific handling and no choice of partition scheme, which matters on modern computers that boot in UEFI mode. There is also no bad block check and no verification pass after writing.
For current hardware, Rufus handles UEFI, GPT and large images properly, and it is the tool most people should reach for first.
When you need more than one image
The program writes one ISO per stick, and every burn replaces what was there. If you keep several installation and repair images and want them on a single drive, a multiboot USB creator lets you copy ISO files onto a prepared stick and choose between them from a boot menu, with no rewriting between images.
Conclusion
ISO to USB suits someone with an older computer and a standard installation image who wants a bootable stick without learning what a partition scheme is. Its willingness to write FAT32 where other tools insist on NTFS rescues exactly the old laptop that nothing else will boot.
For modern machines it falls short. No UEFI handling, slow writes and reports of crashes mean it should not be your first choice on current hardware. Keep it for the legacy case where its simplicity and its FAT32 support are precisely what the job needs.
Pros & Cons
- Four-control interface that needs no prior knowledge
- Accepts FAT32 for bootable sticks on older machines that refuse NTFS
- Works with BOOTMGR and NTLDR installation images
- Non-bootable mode unpacks an ISO as plain files
- Slow writes, with reports of hangs and crashes mid-burn
- No UEFI handling or partition scheme choice
- FAT32 cannot hold the single large file modern images often contain
- Only one image per stick, with no verification after writing
Frequently asked questions
FAT32 for bootable sticks, especially on older computers. Switch to NTFS only when the image contains a file larger than 4GB.
The tool has no UEFI-specific handling or GPT support, which many modern computers need. A writer that supports UEFI is the better choice for current hardware.
No. Bootable mode works with images using the BOOTMGR or NTLDR boot managers. Other bootloaders are not supported.
It copies the ISO's contents onto the stick as ordinary files, without a boot sector.


